I like
Google Reader, but find its support for keyboard navigation a bit lacking. A few days ago, I thought I would file a feature request with the developers (assuming they read
their mail) for adding hotkeys for page up and page down links, but then I got impatient and sketched up a
Greasemonkey solution of my own instead. It's as
future proof as the google developers allow it to be, and it is fairly easy to change to your own preferences.
When you install my
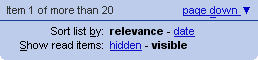
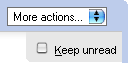
Google Reader access keys script, you will be rewarded with a few additional on-screen hints (some characters who did not use to be have become underlined), and pressing those keys will activate that link or toggle between the choice's available options.
I thought I would dive into how I accomplished this. At the top of the script, you find what looks like (and indeed is) a mapping from keyboard shortcuts to some maybe slightly scary-looking CSS selectors. Edit the key, and your version of the script will have a different set of keyboard shortcuts. To make it a bit more readable, I annotated each key with what function it defines:
var keys = { 'U':'a#queue-page-up',     // page Up
             'D':'a#queue-page-down',   // page Down
             'B':'div#order-by',        // order By
             'S':'div#read-items',      // Sort by
             'E':'div.read-state label' // kEep unread
           };
The selectors point out which element contains the control, and the text it carries. Further down in the script, I use these to find what link to "click" and which piece of text to add the underline hint to. Here is the code that adds the underlines:
var key, selector, node, label;
for( key in keys )
{
  selector = keys[key];
  node = getElementsBySelector( selector );
  if( !node.length ) continue;
  node = node[0];
  if( node.nodeName.match( /a/i ) )
    underline( node, key );
  else if( node.nodeName.match( /div/i ) )
  {
    label = node.getElementsByTagName( 'label' ).item( 0 );
    underline( label, key );
  }
}
Then we set up the keyboard snooping, listening for our access keys:
document.addEventListener( 'keydown', keypress, false );
This will call
keypress() whenever a key is pressed in the reader interface. (The details of that method will follow
shortly.)
getElementsBySelector is Simon Willison's
document.getElementsBySelector(), and would have been massive overkill if the
kind Google Reader Developers would have added id attributes for
all functional components, which they unfortunately do not (...yet? -- the "Keep unread" checkbox only has a class name). If they would have, we would have just put node id:s there rather than selectors and used document.getElementById() instead, halved the script size, shaving off 4K of it in one go and been somewhat less resource intensive runtime.
My
underline() method takes a node and a key (a character) parameter, and tries to find that character in the user visible text contained by the node, and add an underline to the first occurrence of it. (In case the text already had an underline, as is the case with the links, it will add another underline by using the CSS border attribute instead.) It's a very useful function; feel free to pick it up separately:
function underline( node, key )
{
  if( !node ) return;
  var character = new RegExp( '(<[^>]*>[^<'+ key +']*)*('+ key +')', 'i' );
  var hasOne = getStyle( node, 'textDecoration' ).match( 'underline' );
  var style = hasOne ? 'border-bottom:1px solid' : 'text-decoration:underline';
  var underlined = '$1<span style="'+ style +';">$2</span>';
  node.innerHTML = node.innerHTML.replace( character, underlined );
}

function getStyle( node, style )
{
  if( node.currentStyle )
    return node.currentStyle[ style ];
  if( window.getComputedStyle )
    return getComputedStyle( node, null )[ style ];
  return '';
}
Time for the key input crunching code. First, we make sure we got a key we handled and which node it is bound to by our magic
keys mapping above. If it isn't there, or the node isn't (it might become deprecated in a future version of Google Reader), just exit right away:
function keypress( event )
{
  event = event || window.event;
  var key = String.fromCharCode( event.which || event.keyCode );
  var node = getElementsBySelector( keys[key] ), label;
  if( !node.length ) return;
  node = node[0];
Now we look at what node we have picked up -- if it's a plain link, or a label element (as is the "Keep unread" link -- a label with an encapsulated
<input type="checkbox"> tag, to be precise), we just send it a mouse click:
  switch( node.nodeName )
  {
    case 'A':
    case 'LABEL':
      simulateClick( node );
      break;
And if it was a
<div> tag, we look for all its descendant
<a> tags, assuming they are options to toggle between when our access key has been pressed:
    case 'DIV':
      var choices = node.getElementsByTagName( 'a' ), i, current = 0;
      for( i=1; i<choices.length; i++ )
        if( choices[i].className.match( 'selected' ) )
          current = i;
      node = choices.item( ++current % choices.length );
      simulateClick( node );
      break;
  }
Then we look through these links to see which one carries the "selected" class name, pick the next node (wrapping at the number of choices available, so it will find the first choice when the last choice was active) and send it a click.
All of this knowledge of document structure has been picked up by inspection of the page structure in the Firefox Document Inspector beforehand, by the way, so my knowledge of this page isn't anything overly magic.

Just press Ctrl+Shift+I on any page (having made sure you checked the "Developer tools" checkbox on first installing Firefox) and it will pop up. To find out the looks of the tag neighbourhood around "Show read items:", for instance, I first clicked the "inspect this" arrow, then clicked the "Show read items:" text in the main window, and was rewarded with this insight into the structural neighbourhood:

If you
recall the keys mapping, the
Sort by key was bound to the
div#read-items div, in the screen shot above listed as the parent of the label and the two
<a> tags,
read-items-hidden and
read-items-visible. In case we wanted a key to not just toggle between these modes, we could bind either or both directly too, by tucking in another
'H':'a#read-items-hidden', line back there, for instance, following this same recipe. Neat way of adding functionality without really adding any code, right?
Finally, we make sure that the keys we heard are swallowed up, so they don't have any other effect, besides toggling visibility or clicking somewhere or whatever else we did:
  event.preventDefault && event.preventDefault();
  event.cancelBubble && event.cancelBubble();
}
This odd code configuration is a safeguard in case the browser would not support these methods, in which case nothing happens and no errors are left hanging in the javascript error console. It's polite to ask before accessing methods you are not sure about how portable across browsers they are, and user scripts are known to work both in Mozilla, Opera and Internet Explorer (with funky third-part extensions) today so while I don't often try my hacks in all three nor across different platforms, I throw in a few checks like these where I'm uncertain.
The only bit of code left unspoken for now is the simulateClick function, which I picked up from the
Google Reader blog eariler today.
Using this approach, you can add keyboard bindings fairly painlessly to mostly any web page or web application, not only Google Reader. It's easier when you have some kind of guarantee of the developers over there not haphazardly changing document structure and node id:s, classes and semantics of things as often as they change underwear, but even when they do you are usually only some inspection in the document inspector and a few tweaks to the CSS selectors in the keys mapping away from a new version of your own keyboard access features. The best thing, of course, is mailing your improvements to the people behind the site you inject your preferences into, but in the cases where those people are hard to reach (or persuade) the Greasemonkey approach is your ever trusty friend.
Happy accessibility hacking!
 Subscribe via Bloglines
  Subscribe via Google Reader
  Subscribe via MSN Alerts
  Subscribe via My AOL
  Subscribe via My MSN
  Subscribe via My Yahoo!
  Subscribe via Netvibes
  Subscribe via Newsburst
  Subscribe via NewsGator
  Subscribe via Rojo
  Subscribe via Google Reader
  Subscribe via Google Reader