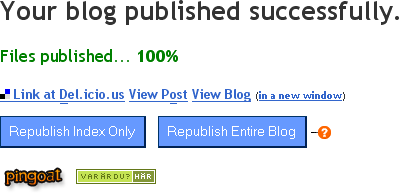
So, what's new? Well, I wanted to make it easier to ping external sites which track new blog posts using HTTP pings rather than polling your RSS feed once in a while, and so the new version adds ping buttons to the publish page. In this version, it supports Pingoat and Svensk lemonad, quite simply because those were the only ones I remembered off the top of my head (<hint>request features!</hint>).

For those of you eager enough to already have taken it out for a spin, here is why it didn't add any buttons -- you have to configure it first. Messy, I know, but there is some thinking behind that too. When you set Pingoat up to ping lots and lots of other sites, there is a point in targeting just sites who apply to your blog. (Or you might be signalling membership in circles you are not part of -- for instance, I believe queerfilter only lists blogs whose authors are not heterosexual. I decided myself on not pinging queerfilter, among others.) First and foremost, though, if you have not installed the script yet, do so.
What you do next is you check the boxes that apply, fill in your blog URL (and optionally feed) and click "Go Pingoat!" -- and lo, at the same time, you also completed the configuration of the publishing ping tool. Because it listens in on your visit to the Pingoat page and configures its Pingoat button to point to this URL. For the blog you configured only. Yep. That wasn't hard, was it?
For Svensk lemonad, a Swedish only site for Swedish geotagged blogs (awfully slim category, I know, but I happen to qualify), there is really only the option of giving a URL to your blog, and it might be argued that such ping sites could be added to all publish pages, regardless of the configuring step? (I am back-tracking my own design thinking now, but bear with me.) That was my first thought, before I had written the code. Because the code happened to become a plugin system which it is very easy to add lots and lots of new buttons to for new ping sites, and it struck me that many of those most likely will apply to very small audiences, such as mentioned lemonade site. So instead of tossing up lots of junk on everybody's publish pages, I decided on this "opt in" kind of system. If you want Svensk lemonad, go there once and set it up, and you will get the button. If not, don't, and you won't see the thing.
So far, so good. So, what happens when you click one of these buttons? Well, the ping page is loaded. Only not in a way that loses the publish page -- it's done in the background, and the icon will slowly pulse while the page is being fetched. When the pulsing stops, it's finished (and hovering the image will tell you how it went). But you don't really have to hover it to know, because if it failed, the flashing will stop at a semi-transparent button, whereas it will be fully solid if it was successful. Typically you will only see it go from solid to transparent to solid once before it's done, but don't be disappointed. You'll get to see it again next time you post. ;-)
If you really want to see the results, though, you can open the link in a new window or tab, but I would suggest not clicking on the button first, because then both the helper and the new frame will perform the ping, and at least pingoat will only report its results on the first click (telling you to wait for a while before pinging again on the second click -- and a healthy design choice too, if you ask me).
That's pretty much that. This article would probably be a lot more selling if it also explained what the ping protocol does, is, and how this would benefit your blog's visibility, but I don't have any pointers handy. Oh yeah, almost forgot. There are keyboard access keys added too; you see them marked with underlines for the text links, and get mouseover hints for the buttons. I added the same feature for my CommentBlogging user script too (read the full article, if you missed it) while at it; you might want to reinstall, to get Alt+d for adding the tag and Alt+o (on Windows; the qualifier key differs across platforms) to go to the original post from the "comment posted" page. The same keys apply on the publish page as well. Enjoy!